

Low temp cooking is one of the many culinary techniques available nowadays. It goes with the name, lower temperatures than with other more traditional techniques are applied, namely below the boiling point and even those considered risk temperatures. Although not mandatory (i.e. low temp eggs) it normally is used in combination with another tool, vacuum, to such extent that is very common to use the term sous-vide cooking to refer to low-temp techniques.
Using low temp requires precise control of time and temperature, not only to achieve a safe product (pasteurization), but also to get the desired tenderness and flavor concentration. In fact, tenderness is tightly related to the temperature the protein is cooked at. When sous-vide cooking, you have to avoid hot spots or temperature variance between outer and inner sides of the protein.
Any heating process involves energy transfers from the hot source to the cold source. There are three different heat transfer mechanisms in nature: conduction, convection, and radiation.
In the heating process of sous-vide packaged proteins only two apply. Conduction, mainly inside the bag. This is the way energy is transferred from the surface of the protein to the core. And convection, when the water or air is flowing around the bag. In both cases, it's important to remember that the energy transfer happens from the hot source to the cold (protein) and the higher the temperature gap, the faster it happens. This is when we find one of the disadvantages of this technique as compared to others that are high temp, so to speak: Low temp means small gap, so heat transfer speed is low. In other words, is not fast. The far superior heat exchange rates of water as compared to air(consider temp is below the boiling point of water), the easiness to control water temperature tightly and the relative simplicity of the equipment are some of the reasons why immersion circulators are the preferred choice when talking about equipment to apply this technique.
After many testing in our lab, it is very clear there is a common pattern when retherming products in a water tank using immersion circulators. In order to introduce this pattern and the different phases we can find on it, we’ll use real data gathered during one of those real life testing.
Let’s see what it looks like the core temperature of a protein in a sous-vide bag.
Bath and Probe Temp Data log
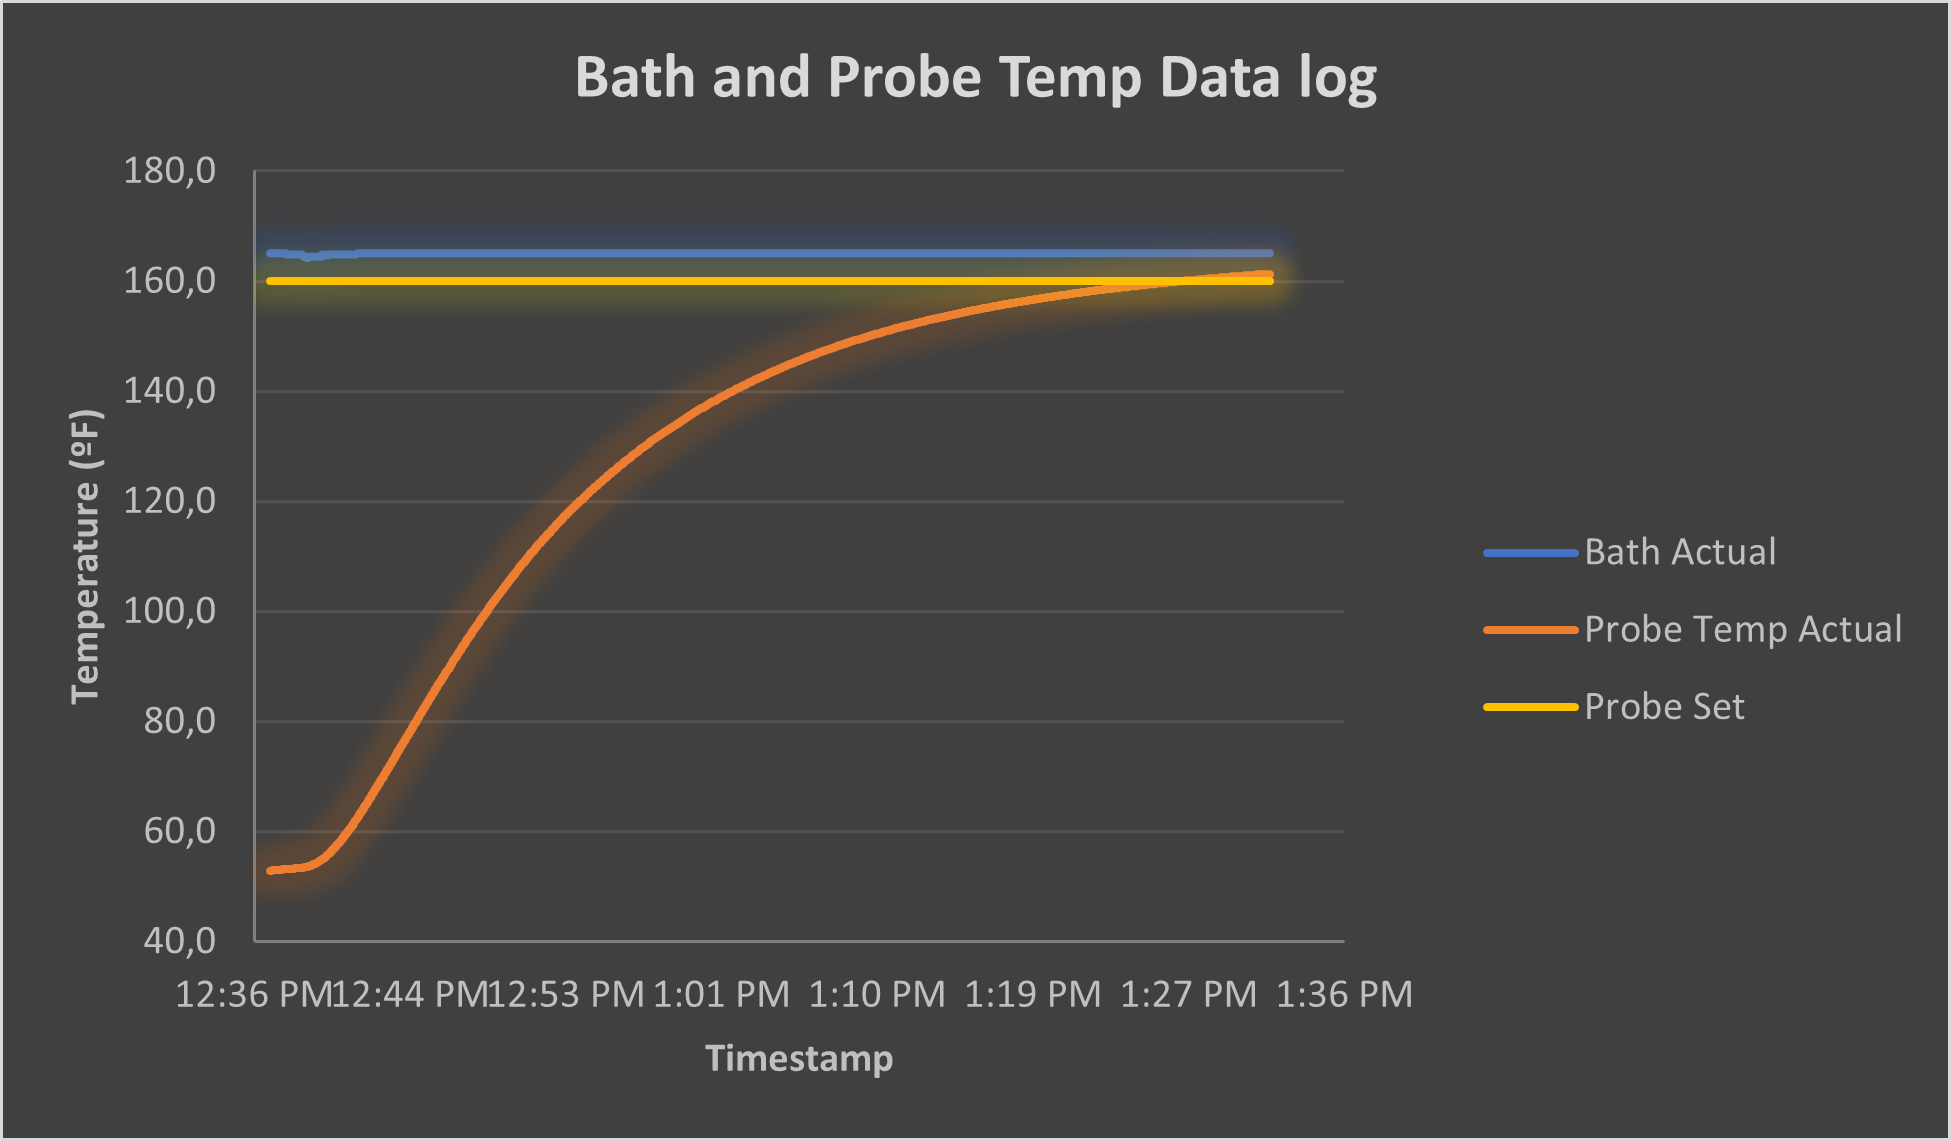
This specific graph was obtained while retherming chicken breast in a Sammic XL+120P immersion circulator. It was a batch of 30 individually packaged chicken breast, all of them put in bulk-mode in the same basket. That is, there was not any positioning of the bags to improve the water flow. The probe was measuring the internal temperature of one of the bags in the middle of the basket (worst case scenario). The target temperature for the probe was 160F, while the water temperature was set to 165F. It took 50 minutes to hit the target temperature.
NOTE: all values are taken from that testing and therefore cannot be applied or make extensive to other proteins or cooking conditions. However, as we said earlier, the patterns that we see, indeed, are found in any immersion+low-temp cooking cycle.
Let’s have a deeper look to this graph. First thing to notice, it is not a linear process. It took 13 minutes to increase the temperature from 53F to 107F, but then, another 33 minutes were needed from 107F to 160F. It’s fast at the beginning and it slows down at the end. If we calculate the heating speed measured as Temperature increase per minute throughout the cycle, we get the following graph:
Heating Speed DT/t (Fº/min)
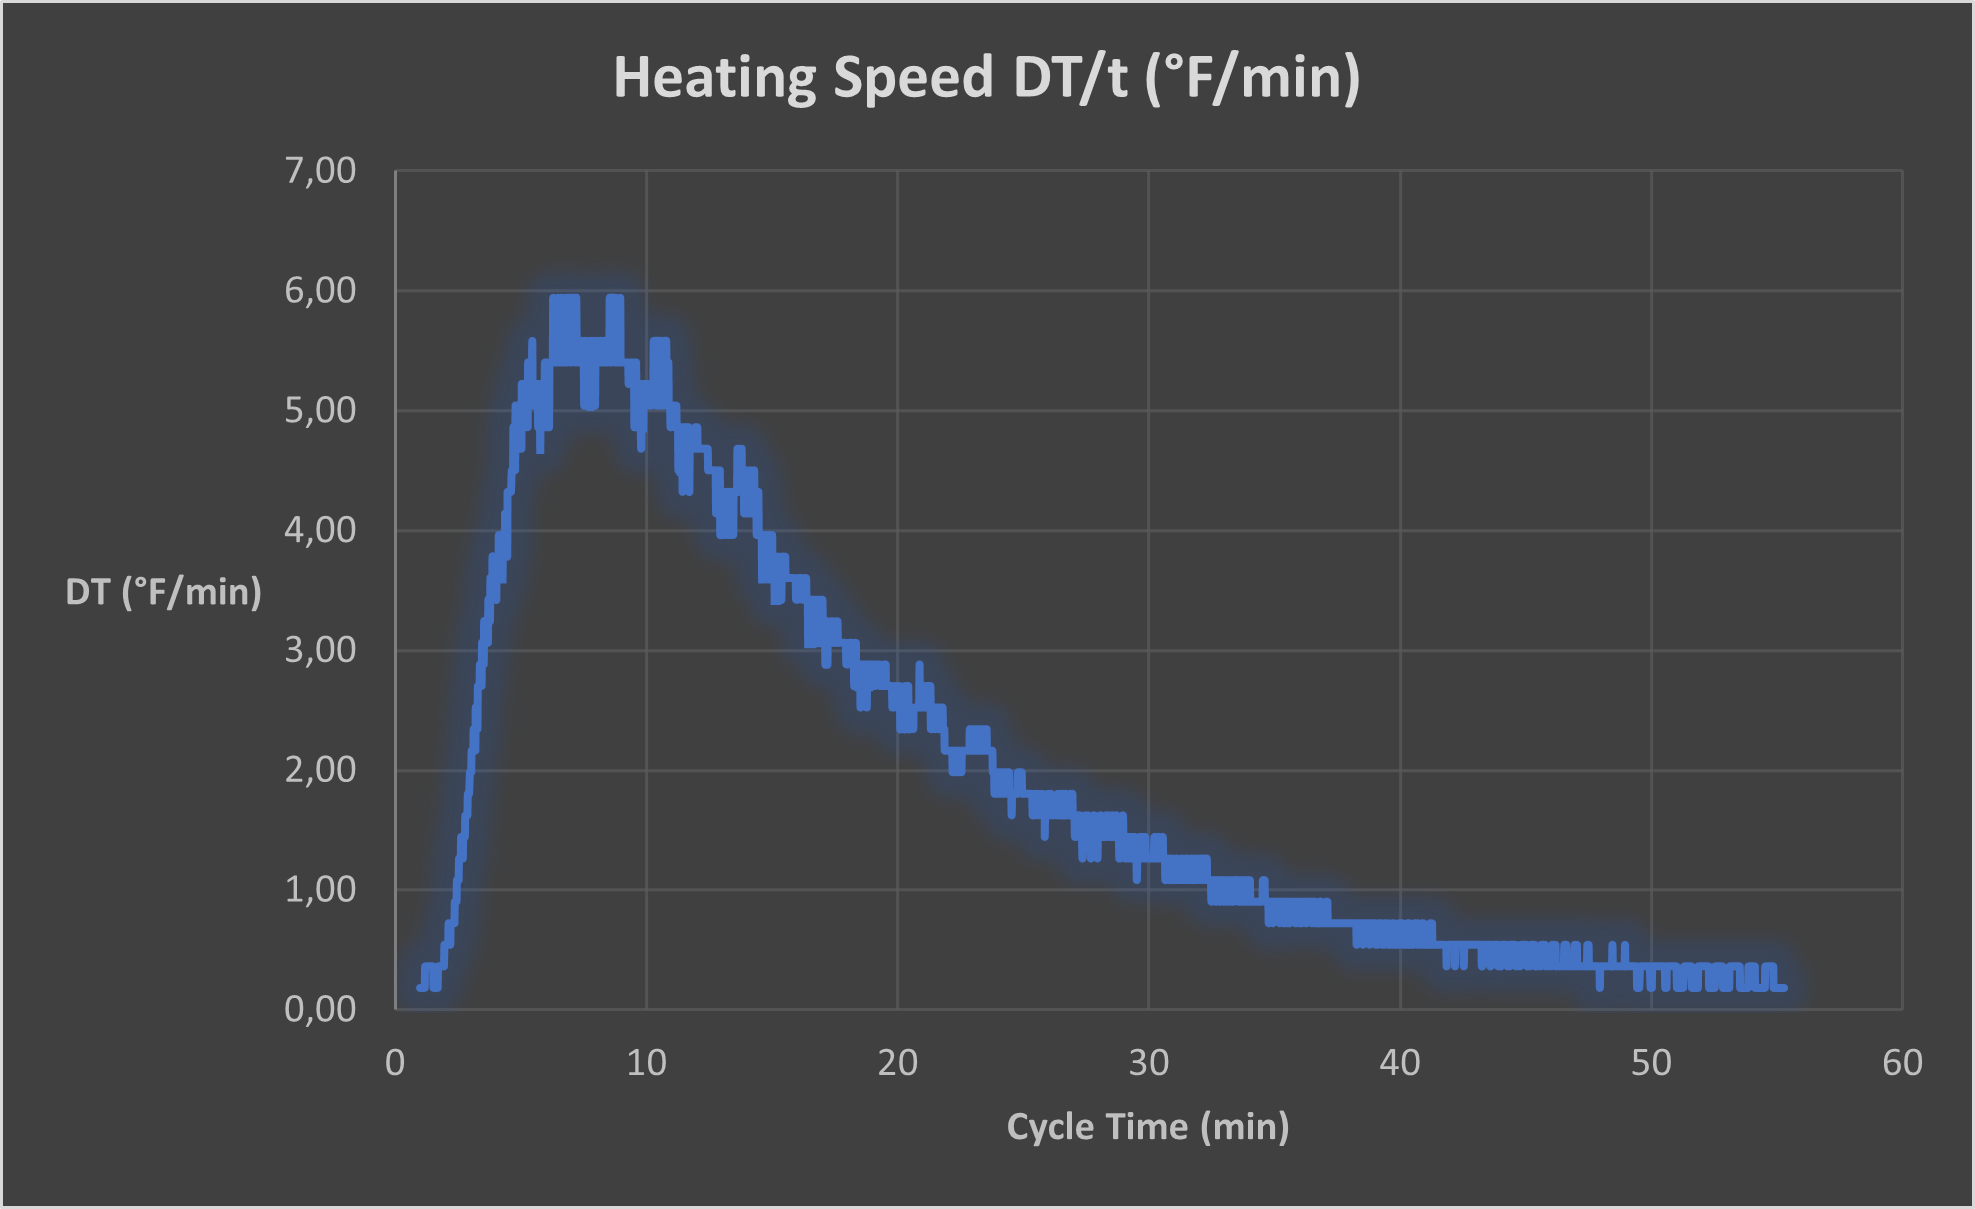
As we are using a core probe, there is a lag until energy starts to arrive to the core. In less than 5 minutes, we hit the maximum heating speed that is around 5/6 F per minute in this cycle. This speed is kept for some minutes but quickly starts to slow down. At the end, the speed is very slow (0.2/0.4 F per minute).
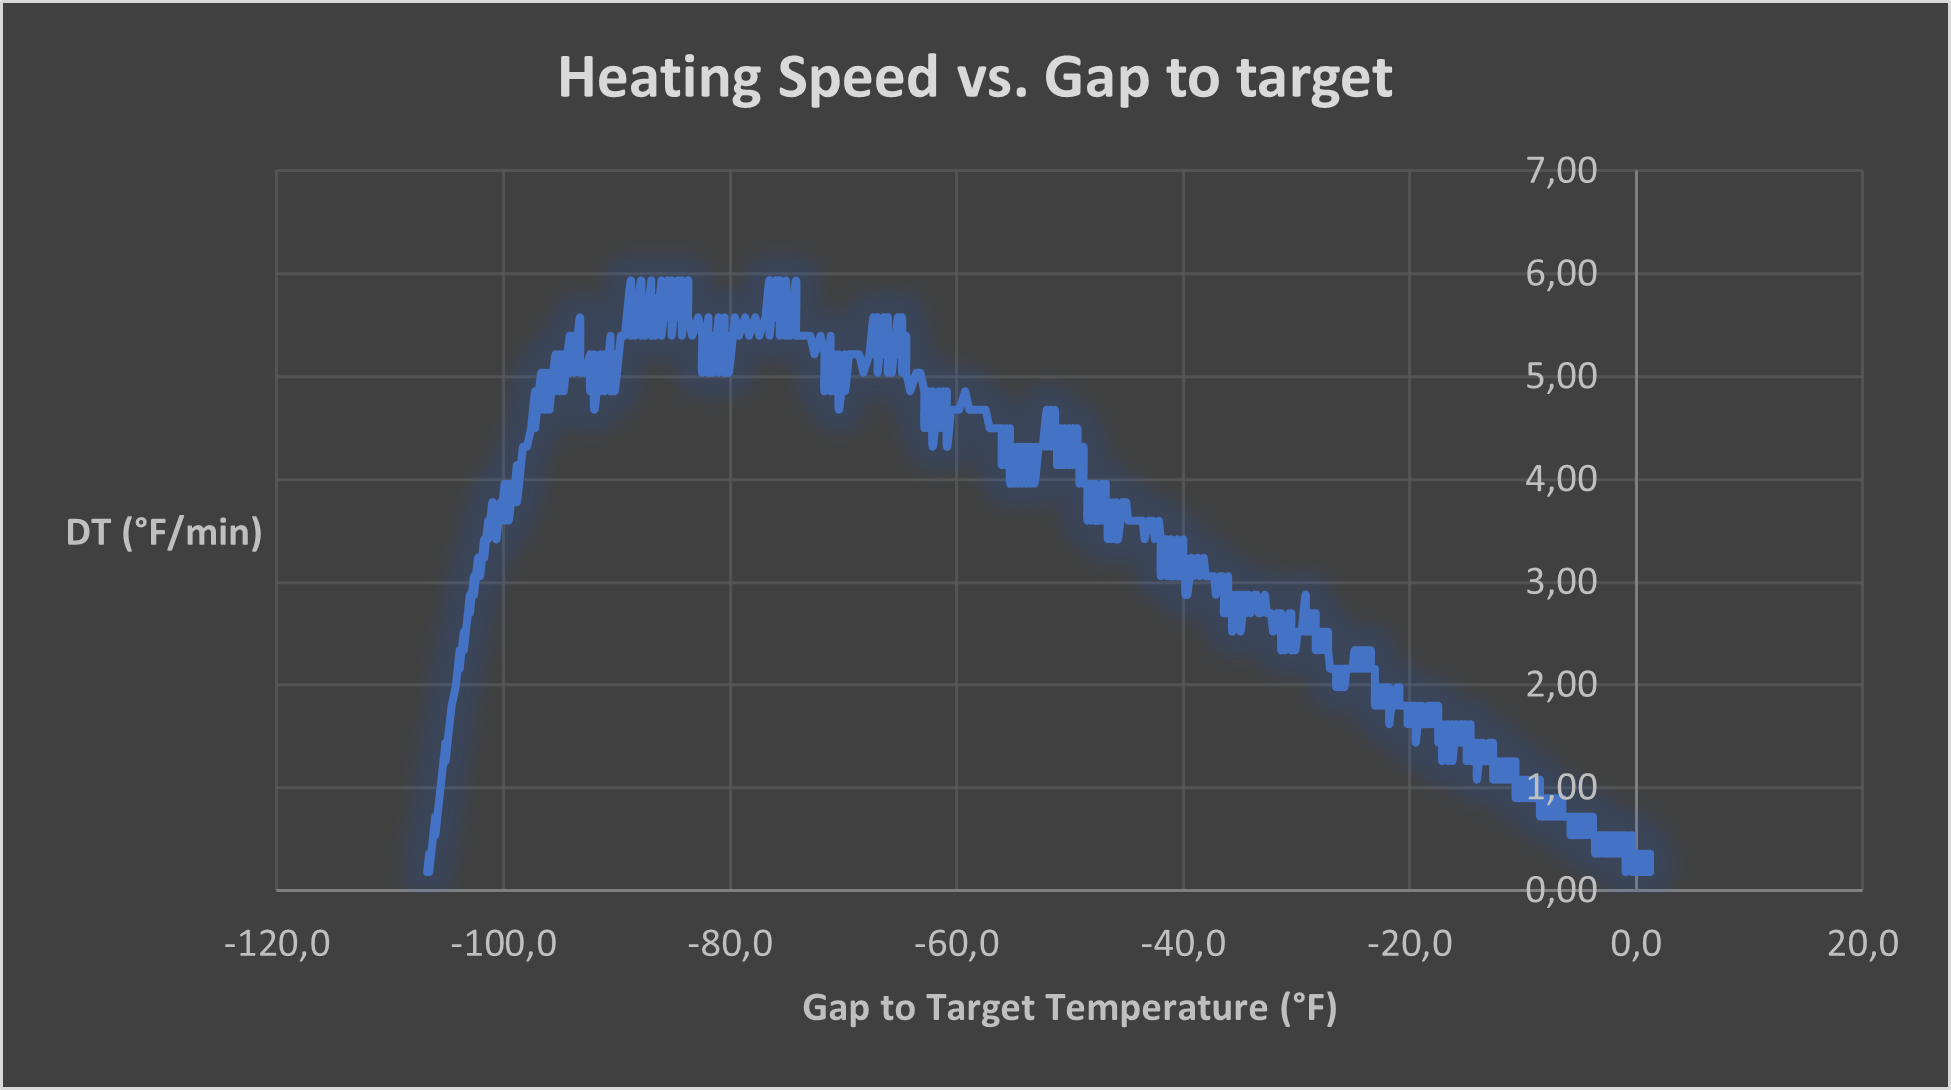
To better understand the reason why this happens, we’ll use the next graph where we have calculated the heating speed as compared to the gap between the water temperature and the target temperature for the probe. As you can see below, there is a similar lag for heating speed to increase at the beginning of the cycle. But then, we can see that the speed remains high while the gap is high and starts to decrease when the gap drops below 60F. Interestingly, the decrease is linear with the temperature gap.
Heating Speed vs. Gap to target
What can we learn from this pattern?
- As the heating speed is not linear, it’s not that if we increase the gap to bridge by 10% we are increasing the time by 10%. So, in our testing, if we had to heat to 150 instead of 160, it would take roughly two minutes less, given we adjust the water temperature to 155F (+5 over the core temp target).
- At the same time, if we increase the water temperature to have a bigger gap between the core temperature target and the water, this will expedite the whole process. This is what makes DeltaT so popular when cooking low temp. Indeed, setting the water temp to the same value we want to achieve for the core temperature would make the cycle to take extremely long. Needless to say, if there is not a proper time control and we set a very high deltaT, there is a risk to overcook the protein.
- The actual nature of low temperature cooking/retherming is actually helping us to have safe cooking processes. Let’s see why.
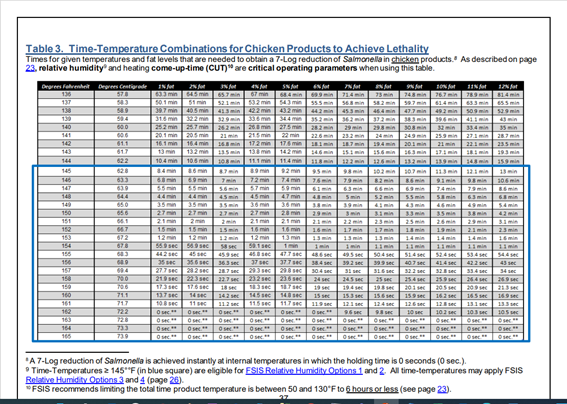
Following the Time-Temperature Combination for different proteins that the FSIS has made available to all of us in FSIS Cooking Guideline for Meat and Poultry Products (Revised Appendix A) (usda.gov), we know that there are multiple combinations of Time and Temperature that can achieve a proper pasteurization of the protein.
We have included the table below for the chicken protein. We can learn from there that to pasteurize at 160F it takes 17 seg.
Time-Temperature Combinations for Chicken Products to Achieve Lethalty
If multiple bags are put in a water tank at the same time all of them will have a similar behavior, but not necessarily exactly the same. Small differences may happen depending on the actual size/thickness of each portion and the location of the bag. If we have a higher water flow surrounding some bags, we will expedite the heating process of those.
Going back to what we learned in our experiment, we saw that the bigger the gap the faster the process. This means that those bags that for whatever reason are faster at the beginning, will slow down first while the rest will keep heating at a higher pace. And will not slow down until their gap is small.
Picking the value for 150F(10F less than our target) from the FSIS table, we see that to achieve pasteurization we need to keep that temperature for 4.2 minutes. The core probe hit 150 after 33 minutes, that is 17 minutes before the cycle ended. It would have been enough to keep it there or above for 4.2min, but we kept it another 17min. This means that we don’t need to have an ultra-precise water flow or portioning to achieve pasteurization among all the bags of a batch as the real nature of the low-temp cooking/retherming process will help us.
At the same time, it’s important to understand that deltaT or the gap between the water temperature and the target temperature for the core probe, should not be too big. Two reasons. One mentioned before has to do with getting the right tenderness. Second, it may expedite the process to such extent that small variances regarding the portioning or the exact location of the core probe cannot be overriden.
Finally, we have calculated when we achieved different combinations from the FSIS table for chicken. You’ll find the data below.
|
Probe Temp (F) |
Time since Cycle started (min) |
Hold Time to Pasteurize |
Time To Pasteurization (min) |
|
145 |
28,70 |
13,0 |
41,70 |
|
146 |
29,38 |
10,6 |
39,98 |
|
147 |
30,23 |
8,6 |
38,83 |
|
148 |
31,22 |
6,8 |
38,02 |
|
149 |
31,98 |
5,4 |
37,38 |
|
150 |
33,05 |
4,2 |
37,25 |
|
151 |
33,97 |
3,1 |
37,07 |
|
152 |
35,23 |
2,3 |
37,53 |
|
153 |
36,20 |
1,6 |
37,80 |
|
* Cooking cycle ended after 50,05 minutes. |
|||
For the FSIS, the protein was pasteurized after 37 minutes. It reached at 151F in 33.97 minutes and was kept there for 3.1 min. But the cycle did not finish till 13 minutes later. More than enough to absorb any small variation regarding positioning or thickness of the portion.